

- HomeCrafter Plus
- Paintshop Pro 7 or some other drawing tool that has layers, gradients and noise.
- Home Crafter Plus is from the Sims 2 Site
- A Paintshop Pro demo version can be obtained from Jasc - but it's well worth buying if you can afford it.
BEFORE WE START:
Maxis/EA have done a terrible thing to us as creators and users - they've made objects more anonymous than they used to be.
As Creators, it's difficult to work out which file is what we've created to share.
As Users, trying to identify files we want to move in and out of the game or delete is impossible when we can't tell the difference between a package that's a wall, a floor, a skin or an object recolor.
So we need to get around this, especially if we as creators don't want to use Sims2packs.
The easiest way to identify our creations, is to create them in a game which has nothing else in it.
If you've done the Tutorial, "Creating a Game Space for Sims2" then you'll know what I'm talking about in Step 1. If you haven't done that tutorial - go do it now. We'll wait for you.

Rename your playing version of The Sims 2 to "The Sims 2 - Play"
Rename your testing version to The Sims 2.
(In the Example, I'll rename "The Sims 2 - Build" to The Sims 2)
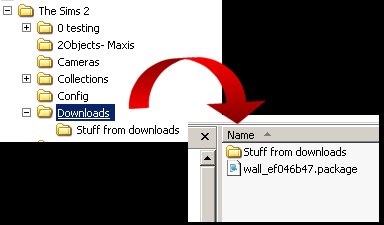
If you look in "Downloads" folder - you notice it is empty. (If it isn't, then make it empty, you can leave in the C.E.P. package though).
Creating things is done in the Projects folder, under "HomeCrafter Plus" folder.
New walls and Floors and Ground Cover, go as bitmaps in the folders labeled Floors, Walls, and Ground Cover. You can put sub-folders in these folders, but HomeCrafter will only take notice of the those folders.
The Working Directory is where files are put when they are being edited. (You can basically ignore this folder, unless you've got things to correct).
The other thing, is that walls are no longer limited to 256 colors.
So lets start with a basic wallpaper - as in Sims 1 but making it for Sims 2. I won't explain the same things again - feel free to go have a look at the sims1 tutorial if there's a setting you don't understand.
Open up your paint program and create a new file 256 x512.
Set up the details as in the picture. This allows you to create a quality image with good color. (The Sims 1 tutorial has an explanation of all the settings).

Set up the gradient as in the picture, with the white at the top, and the other color at the bottom, no repeats.
You can also add a wallpaper border if you like, but I'll let you find your own, to match the colors you've chosen.
When you've done all your fiddling, merge all the layers together, and save it as a bitmap into the folder:
My Documents\EA Games\ The Sims 2\Projects\HomeCrafter Plus\Walls
Don't worry about reducing the colors - we can have millions of colors in the game now.
Do as many bitmaps as you like, before you convert them into the wallpapers using HomeCrafter Plus.
I've done Two walls.
When you save your bitmaps, give them a descriptive name - you'll be able to track the walls through HomeCrafter and for loading on a website.

This is the splash page. You don't have to come back here after you start creating your walls, floors, whatever - you can swap in the next page.
Choose "Create Wall Coverings" anyways. We might as well go there straight away
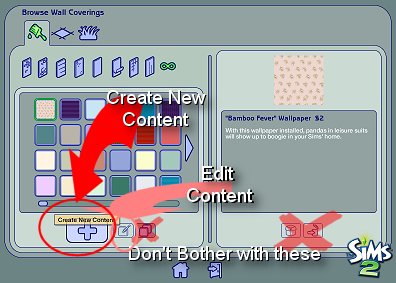
Unless you're cloning an existing wallpaper, you might as well ignore all but the buttons at the bottom.
Don't bother with the Clone button or the packaging button or the delete button. Sims2Packs are a waste of time and space.
The button to choose for new wallpapers is the "+" sign. Click on that, and it will bring up the bitmap list for you.
As you can see, it only gets bitmaps from the Walls folder.
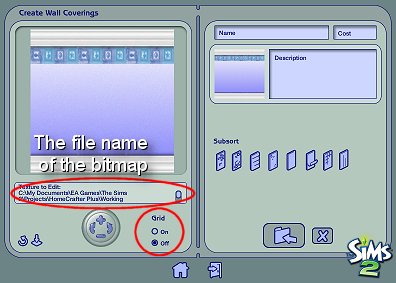
The Sub-sort is the same as the sub-sort that is used in the game. If you hover your cursor over the different types, it'll describe it if you're not sure. You must pick a sub-sort though. It won't let you save it otherwise.
The Left hand side has the less obvious
things. First up the picture displayed comes in with 3 vertical lines.
This is the grid. You can turn it off with the radio button in the circle.
If you look at the texture to Edit: you'll notice a couple of things - (1)
the folder that it is displaying from is the working directory. If you
notice there's a problem with your bitmap, WHILE HomeCrafter is
open, you can open up this bitmap and correct it. Then refresh the bitmap
with the button on the extreme left hand side. (2) The bitmap has the same
name as you gave your original.
The +/- left/right arrows in the middle are about turning the wall, and zooming in and out. (Fairly, to very useless). If you do use it, then the button with the arrow pointing down, will reset the view back to default.
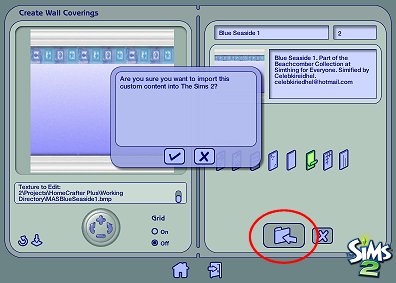
This is why you don't bother with the sims2packs.
Pressing it, will bring up the confirmation window, select tick to complete the process.
There - you've made a wall.
That wasn't hard was it?
CLOSE UP HOMECRAFTER when you've finished making your walls and floors
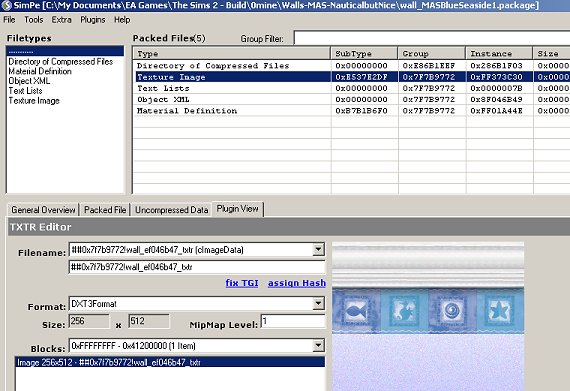
So lets make it more descriptive. I like the wall_ prefix, so I leave that there and just change the gobbledygook to a meaningful name.
Tip: If you're doing a large number of wall files at once, and you've done them in alphabetic order (based on the bitmap names), then you can rename your wall files without needing to work out which wall is which. The way to do that, is to sort the windows explorer window by "Date Modified" or "Date Created". That will put the walls in the order that they were created, which is the same as the alphabetic bitmaps (even though the gobbledygook names aren't in that order).
Um Kiri - I don't know which wall is which - how the halibut do I work it out?
Or open up the package with SimPe. Select the Plug-in View, and click on the "texture image" - and there it is. The Object XML will show you the internal name and description.
Using Windows Explorer, go into My Documents\EA Games\
Rename your testing version of The Sims 2 to "The Sims 2 - Testing"
Rename your playing version to The Sims 2.
(In the Example, I'll rename "The Sims 2" to "The Sims 2- Build").
Move your new walls into the play game, into a new sub-folder or such like. Feel free to share them. And there you go - All Done.